Areas
Surtitles can be positioned anywhere on your computer screen using areas. Each area is a rectangular region in which the cards contained in a track are displayed.
Areas are edited from the display configuration interface. Click the  button at the top right of the Koinè window to bring up this interface.
Main view
The areas appear in the main view of the display configuration interface. This view shows the content that will appear on the display during projection. The display boundaries are represented by a rectangle with a black background. The area boundaries are shown as gray rectangles.

Editing areas
Select an area
To select an area, click it in the main view. The outline of the area will be highlighted to indicate that it is selected.
Tip
You can also press Tab repeatedly to select each area one after the other. Press Shift+Tab to select the areas in reverse order.
Add a area
To add an area, click the  button in the toolbar, then choose the track you want to display from the drop-down menu.
The drop-down menu also includes the Empty Area option. This option allows you to create an area that is not initially associated with a track. After selecting this option, drag a rectangle on the main view to create the area.
Delete an area
To delete a area, select the area, then press the Delete key.
Move an area
To move an area, drag the area to the desired position.
While dragging an area, you can hold down the Shift key to move the area along a single axis.
Tip
You can also use the keyboard to move an area. Select an area, then press the arrow keys. Hold down the Shift key to move the area more precisely.
Resize an area
To resize an area, select the area, then drag one of the selection handles located on one of the four corners or on one of the four sides of the area.
When dragging a handle, you can hold down the Shift key to resize the area while maintaining its proportions.
Tip
You can also use the keyboard to resize an area. Select an area, then hold down Alt while pressing the arrow keys. Hold down Shift and Alt simultaneously to resize the area more precisely.
Area properties
To access the area properties, select the area by clicking it in the main view. The area properties panel will appear on the right side of the display configuration interface.
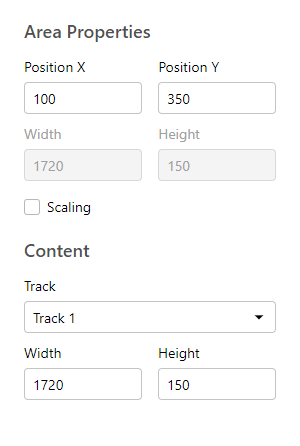
Position X & Y
The X Position and Y Position fields correspond to the coordinates of the upper left corner of the area.
The point (0, 0) is located at the top left of the screen. The X-axis extends to the right and the Y-axis extends downwards. The units are in pixels.
Width & Height (of the area)
The Width and Height fields located directly below Position X and Position X indicate the horizontal and vertical dimensions of the area. These dimensions are measured in pixels.
By default, the area adopts the displayed track size, unless the Scaling option is enabled.
Scaling
The Scaling option allows you to enlarge or reduce the displayed track size. When this option is enabled, enlarging the area makes the content appear larger, and reducing it makes it smaller.
You can use this option to display multiple copies of the same track in different sizes, or to adjust the display size without disrupting the card layout.
Track
The Track field allows you to choose the track displayed in the area. The drop-down list includes tracks that have been created in the editing interface. When a track is selected, the size of the area adapts to the size of the track.
The Empty Area option causes the area to display no content.
Width & Height (of the track)
The Width and Height fields located directly below the Track field correspond to the horizontal and vertical dimensions of the track. These dimensions are measured in pixels.
These dimensions can also be modified from the track properties.